How to Install an Automatic Livestock Waterer (The Right Way)
Installing an automatic waterer the right way makes all the difference in its durability and performance. This, combined with regular cleaning, will help keep your Ritchie running well for many years — even past our industry-leading 10-year warranty.
Check out the answers to these common questions to see how we recommend getting it done.
What size water supply line do I need, and how deep should it go?
A minimum 3/4-inch waterline is required, but we recommend going with a full 1-inch diameter line for better flow and long-term performance. Be sure to flush your waterline before hooking up your waterer because small debris can lodge in the valve and keep it from sealing.
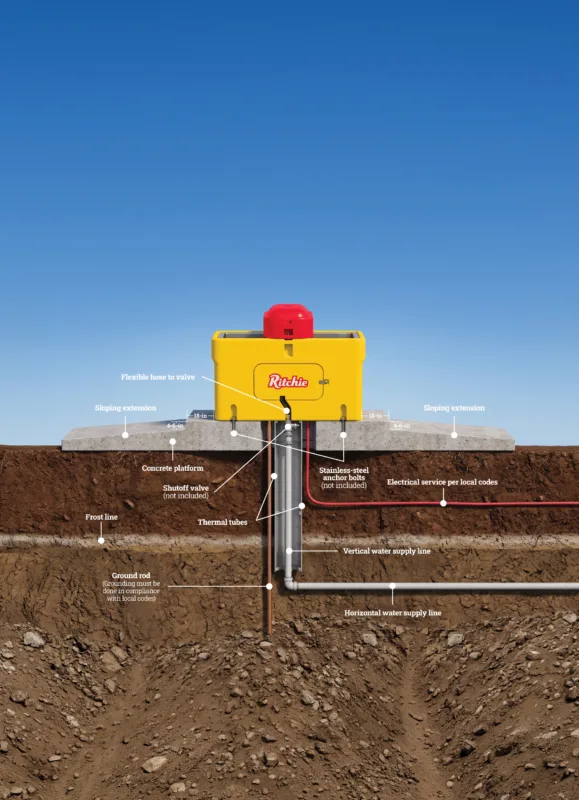
When it comes to depth, it’s not just about freeze protection. Proper depth helps regulate water temperature — keeping it warmer in winter and cooler in summer. So, don’t cut corners: Bury the horizontal supply line at least 4 feet deep or 1 foot below your local frost line, whichever is deeper.
Want easier maintenance down the road? Install a shut-off valve beneath the unit. You’ll thank yourself later.
Do I really need thermal tubes?
If you want reliable year-round performance, yes — you do. Ritchie thermal tubes are designed to protect your waterline and maintain consistent temperatures. To get the most out of them:
- Choose the correct tube length for your setup.
- Center the vertical waterline inside the tube.
- Extend the tube at least 1 foot below the frost line.
And one important note: Don’t add insulation inside the tube. It may seem helpful, but it can actually create a pathway for frost.
What’s required for the electrical connection?
You don’t want to take shortcuts with your electric components. They need to be done right to ensure safe operation to protect your animals and your investment. You should:
- Always use a qualified electrician.
- Follow national and local electrical codes.
- Include a proper disconnect in the fixed wiring.
How should I build the concrete platform?
A solid base keeps everything working as it should. We recommend:
- A 4- to 6-inch-thick concrete pad.
- A minimum 18-inch perimeter step around the unit.
- Additional concrete extending outward, sloped away for drainage.
Make sure the platform is level because it’s critical for proper waterer function and makes it easier for animals to drink. A concrete pad large enough for an animal to stand on with all four legs improves footing, reduces mud and keeps things cleaner. And, for waterers serving a lot of animals, go bigger.
How do I properly anchor the waterer?
This is where precision matters. Skipping anchors — or guessing placement — can lead to movement, leaks, and long-term issues. Lock it in right the first time. Be sure to:
- Use stainless steel anchor bolts.
- Secure the unit using all provided anchor locations.
- Set anchor positions using the actual waterer as your template.
What about grounding and safety?
Grounding isn’t optional. It’s essential. You must:
- Install a grounding rod according to local and national codes.
- Use a separate stranded copper conductor (minimum #6 AWG).
- In confinement areas, an equipotential plane is required by the National Electrical Code (NEC).
Most states in the U.S. follow NEC standards, but always check with your local electrical inspector to be sure. If you are outside of the U.S., consult your distributor.
What’s the key to long-term livestock waterer performance?
It’s simple: install it right, then stay on top of maintenance. Every detail, from line depth to a level pad, adds up to better performance and fewer headaches later on. Pair that with regular cleaning, and your Ritchie waterer won’t just meet expectations — it’ll outlast them.
An installation job well done is one that lasts.
Following best practices is key to installation — but so is thinking through the real-world conditions your waterer will face. From heavy equipment and animal traffic to seasonal use or placement in muddy, low-lying areas, small adjustments during installation can make a big difference in long-term performance. Talk to your Ritchie distributor if you have questions about how your setup might impact your install. They can help you plan to keep your waterer reliable and efficient for years to come.
More questions?
Do you have questions about installing a specific Ritchie waterer? Check out our library of installation manuals. You can also find some installation videos on our YouTube channel.